
I have been pacing a bit since my last walk, eager to get back out again but the weather has not been kind. Last night the forecast was for a very cold but dry start to the day with rain moving in around lunch time.
Great.. I had a walk in mind that was possible before the rain arrived.. and even if the weather closed in and I had to navigate by compass ..it was a safe enough in round rolling hills to the west of the Ochils.
I wanted to do the circuit around the Old Wharry Burn from Sherrifmuir. The six mile hike will take in six small hill summits including the "Donald" Blairdonan Hill at 631m high. Altogether its only around 1500ft of ascent so I had hoped to be home and dry for lunch.
I drove up to Sherrifmuir from Dunblane at sunrise. The road was covered in black ice so I took it easy. Dumyat looked very inviting from this angle against the red morning sky.

The walk I was going to do starts at the Sherrifmuir Inn. The hill at the back in this photo is Greenforet which is just in front on Blairdenon Hill.

The route circumnavigates the Old Wharrel Burn so the distance to Blairdenon Hill as the crow flies is a bit deceptive as I found out.

I soon got my pace and was standing on top on the first hill called Little Hunt Hill. It offered a great view of the Sherrifmuir where the battle was fought in 1715 at the height of the Jacobite rebellion. The 2nd Duke of Argyle (John Campbell) brought 4000 men here to stop the 6th Earl of Mar (John Erskine) who had an army of 12000 men from controlling the area. By evening both armies were greatly reduced. but the battle was inconclusive. Both sides declaired victory as they both withdrew.
As I surveyed the moors, I imagined the sight of 16000 men hacking bits off each other with swords and claymores. It was a stark reminder of how lucky I have been not to have been involved in the horrors of any battle.
This panorama of three photos shows the area where the battle took place. The small photo just does not do the scene justice. It will get a little larger by clicking on it.

This is part of the larger photo and shows the Sherrifmuir Inn

I was now on the summit of Big Hunt Hill and I could see the weather front coming in from the west... very fast. I still had to traverse around the Menstrie Moss area before approaching Blairdenon from the south.

The weather started to close in when I was on Menstie Moss. This is a view looking back down the Old Wharry Burn towards Big Hunt Hill (left back) and Kidlaw Hill (centre) which I skirted around.

This is looking from the moss over to Bengengie Hill which is the summit I was on at the start of the week.

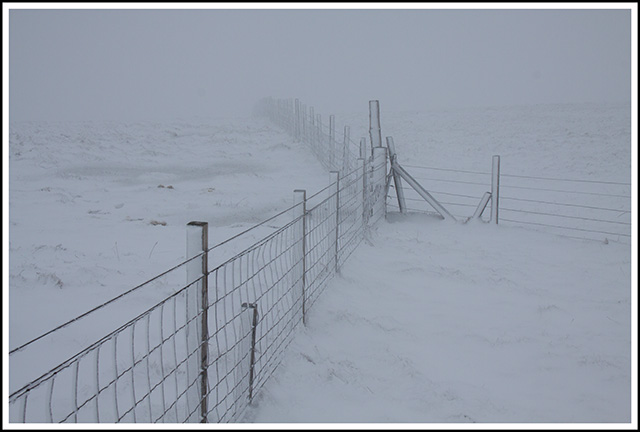
The mist closed in as I took a compass bearing on Blairdenon. Fortunately I had now reached the fence line that goes to the top of Blairdenon so even if I couldnt use my compass, I couldn't get lost :-D
I was looking for the monument and remains of the Tiger Moth that crashed into the hillside near the top of Blairdenon Hill in 1957 killing its pilot. I had no problem finding it and it was another moving moment as I thought about the accident and sad loss of life at this spot

Shortly after I summited Blairdenon. There is not much of a cairn here, just a small pile of stones near the junction of three fences. I dont know what the view is like as I saw no more until I had crossed Greenforet hill, Mickle Corum Hill and Glentye Hill. My navigation worked and as I reached the Sherrifmuir moors again, the cloud lifted slightly, the snow stopped and torrential rain started. Still... I was almost back at the car.
I stopped to take a photograph of Wallace's Stone which is near the Sherrifmuir Inn. There are five standing stones here but the other four have long fallen. They are all in a straight line pointing towards the Carse of Stirling.

When I got to the car I was soaked through but very happy with the endorphines I produced while walking. I had intended taking a Photo of the Sherrifmuir Monument and then walk over to the Gathering Stones but I was now too wet and cold so I have attached a couple of photos from a previous visit to the moor.
Monument commemorating the Battle of Sherrifmuir

The Gathering Stones where the Duke of Argyle watched the battle. There are several mounds of mass graves from the battle in the immediate area of the stones

1 comment:
Thanks for sharing! Is there a route map for this anywhere? Had a quick look on walkhighlands but didn't spot one.
Post a Comment